
Parts of a Hearing Aid: Demystify the inner workings of your hearing device and optimize your listening experience. This comprehensive guide explores each component, from microphones and amplifiers to volume control and T-coils. Learn how they work together to bring the world of sound back to you.
Hearing Your World Again: An Introduction to Hearing Aids
Ever feel like conversations are muffled, or struggle to hear the doorbell or phone ringing? Hearing loss is a surprisingly common condition, affecting millions of people worldwide. But it doesn’t have to hold you back from an active and engaged life. Hearing aids are remarkable technological devices that can significantly improve your hearing and reconnect you with the world around you.
In this blog post, we’ll delve into the fascinating world of hearing aids. We’ll explore how they work, their different parts, and the various styles available. We’ll also discuss the importance of hearing aids in maintaining social connections, mental well-being, and overall quality of life. So, if you’re curious about hearing aids or considering them for yourself or a loved one, keep reading!
Parts of a Hearing Aid: A Comprehensive Breakdown
Hearing aids are remarkable technological devices that can significantly improve your hearing and reconnect you with the world around you. But how exactly do these tiny instruments work? This table breaks down the essential components of a hearing aid and explains their functions:
| Part of Hearing Aid | Function | Importance for Hearing |
|---|---|---|
| Microphone(s) | Captures sound waves and converts them into electrical signals. | Provides the raw audio input for amplification. |
| Amplifier | Boosts the strength of the electrical signals from the microphone. | Makes sounds audible for individuals with hearing loss. |
| Receiver | Transforms the amplified electrical signals back into sound waves. | Enables you to hear the amplified sounds clearly. |
| Battery | Powers the entire hearing aid. | Provides the essential energy for all components to function. |
| Volume Control | Allows you to adjust the overall loudness of the hearing aid. | Enables personalization of the listening experience based on environment. |
| Program Button | Switches between pre-set programs optimized for different listening situations (e.g., quiet environments, noisy places, music). | Provides tailored amplification for optimal hearing in various settings. |
| On/Off Switch | Powers the hearing aid on and off. | Enables control over battery life and avoids unnecessary battery drain. |
| Telecoil (T-Coil) (optional) | Picks up electromagnetic signals from loop systems installed in public venues. | Improves listening clarity in specific situations like theaters or conference centers. |
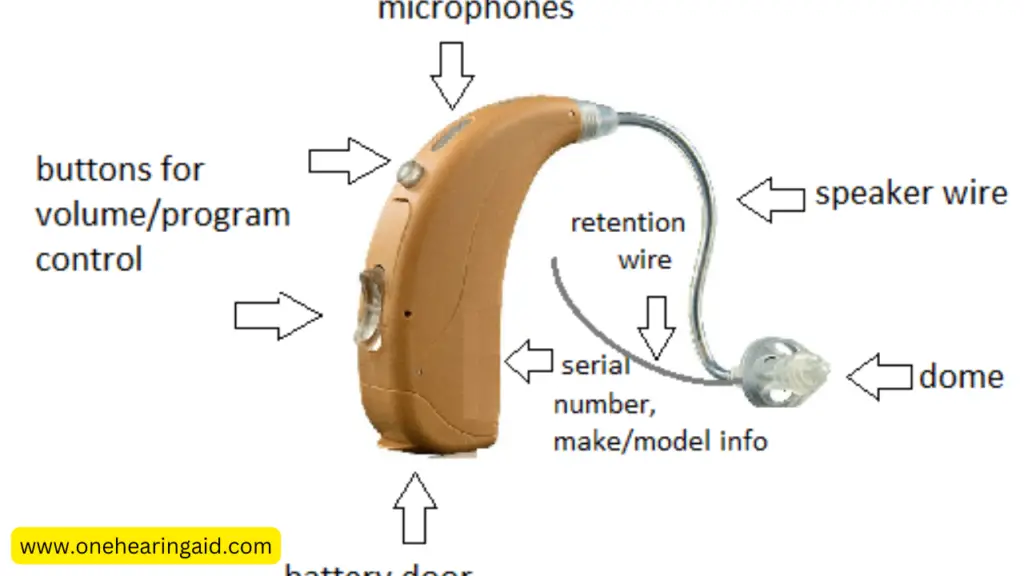
| Ear Hook (BTE hearing aids) | Anchors the behind-the-ear hearing aid securely in place. | Ensures the microphone and receiver are positioned optimally for sound reception. |
| Earmold (optional) | Custom-made piece that fits snugly in the ear canal, creating a seal for sound delivery. | Provides a secure and comfortable fit, maximizing sound quality and preventing feedback. |
| Sound Tube (BTE and RIC hearing aids) | Channels the amplified sound from the hearing aid to the earmold or ear canal. | Bridges the gap between the hearing aid and your ear for efficient sound transmission. |
The Tiny Ears of Your Hearing Aid: All About Microphones
Microphones are the unsung heroes of hearing aids. These miniature marvels act as the ears of your device, converting the invisible waves of sound around you into electrical signals that the hearing aid can understand and manipulate.
Capturing Sound: A Delicate Dance
Imagine a thin sheet of plastic, like a miniature trampoline, at the front of your hearing aid. This is the diaphragm. Sound waves, whether a whisper or a loud bang, hit this diaphragm, causing it to vibrate back and forth. The movement of the diaphragm is then translated into electrical signals by one of two main techniques:
- Dynamic microphones: Here, a tiny coil of wire sits near the diaphragm and within a magnet’s field. As the diaphragm vibrates, the coil moves too, generating a current in the wire due to the interaction with the magnetic field. This current’s strength reflects the loudness of the sound wave.
- Condenser microphones: These use a different approach. The diaphragm acts as one plate of a tiny capacitor, with a fixed plate opposite it. Vibrations caused by sound waves change the distance between the plates, which in turn affects the electrical capacitance. This change in capacitance is then converted into an electrical signal.
Both methods essentially achieve the same goal: transforming sound waves into electrical signals that the hearing aid can decipher.
Microphone Placement: A Balancing Act
The placement of the microphone(s) in a hearing aid plays a crucial role in sound quality and clarity. Here’s why:
- Directionality: Ideally, the microphone should pick up the sounds you want to hear most clearly, like speech directly in front of you. Microphone placement can be designed to favor sounds coming from a specific direction, helping to reduce background noise.
- Wind noise: Microphones placed on exposed surfaces can be more susceptible to wind noise. Hearing aid designers strategically position microphones to minimize wind interference.
- Feedback: Sometimes, the sound coming out of the hearing aid’s receiver can leak back into the microphone, creating a whistling or howling sound called feedback. Microphone placement and design can help reduce this issue.
By carefully considering these factors, hearing aid manufacturers can optimize microphone placement for better sound quality and a more natural listening experience.
Boosting the Signal: The Crucial Role of the Amplifier
The microphone in your hearing aid does a fantastic job of capturing sound waves and converting them into electrical signals. But often, for someone with hearing loss, these signals are simply too weak. This is where the amplifier steps in, acting as the powerhouse of your hearing aid.
Turning Up the Volume on the Electrical Level
Imagine the electrical signal from the microphone as a faint whisper. The amplifier’s job is to take that whisper and turn it into a clear, audible voice. It achieves this by electronically increasing the strength, or amplitude, of the signal.
Think of a dimmer switch controlling the brightness of a light. The amplifier acts like a similar control for the electrical signal’s strength. By carefully adjusting the amplification level, the hearing aid can make sounds loud enough for you to hear comfortably.
Why Amplification Matters for Hearing Loss
Hearing loss is often characterized by a damaged or weakened inner ear, which is responsible for converting sound waves into electrical signals that the brain can interpret. This can lead to:
- Difficulty hearing faint sounds, especially speech at a distance.
- Reduced ability to distinguish between sounds, particularly in noisy environments.
- A feeling of sounds being muffled or distorted.
By amplifying the electrical signals, the hearing aid essentially compensates for the weaknesses in the inner ear. This allows individuals with hearing loss to perceive sounds at a level closer to normal hearing, improving their ability to:
- Engage in conversations and social interactions with greater ease.
- Hear important sounds like traffic noises, alarms, or doorbells.
- Appreciate the full richness of sounds in their environment, from music to nature sounds.
The amplifier is a vital component, providing the extra boost needed for individuals with hearing loss to reconnect with the world around them.
From Electricity to Sound: The Magic of the Receiver
The amplifier has done its job, taking the faint electrical signal from the microphone and turning it into a robust one. But the journey isn’t over yet. The receiver acts as the final translator, transforming this amplified electrical signal back into sound waves that your ear can understand.
The Science of Sound Re-creation
Imagine a tiny speaker housed within the hearing aid. That’s essentially what the receiver is. The amplified electrical signal travels to a coil within the receiver. This coil interacts with a permanent magnet, causing the coil to vibrate back and forth. These vibrations then create pressure changes in the air, replicating the original sound waves that the microphone captured. In essence, the receiver undoes the work of the microphone, but at a much higher volume level suitable for your hearing needs.
A World of Receiver Variations
Receivers come in different types, each with its own impact on sound quality:
- Standard receivers: These are the most common type, offering a good balance of sound quality and power consumption.
- High-frequency receivers: Designed to emphasize high-frequency sounds, which are often the first to be lost with hearing loss. This can be beneficial for improving speech clarity.
- Low-frequency receivers: Provide a richer, fuller sound experience by placing more emphasis on lower-frequency sounds like music or traffic noise.
- Directional receivers: Combine a standard receiver with additional design features to focus on sounds coming from a specific direction, further reducing background noise.
The choice of receiver type depends on your individual hearing loss profile and listening preferences. A hearing healthcare professional will assess your needs and recommend the receiver that best suits you to ensure optimal sound quality and listening comfort.
By working together, the microphone, amplifier, and receiver create a powerful team within your hearing aid. They capture sound, boost its volume, and translate it back into audible waves, allowing you to experience the world around you in a whole new way.
The Unsung Hero: How Batteries Power Your Hearing Aid
We’ve explored the fascinating world of microphones, amplifiers, and receivers, the core components responsible for capturing, amplifying, and recreating sound in your hearing aid. But none of this magic would happen without a crucial element: the battery.
The Engine That Keeps Your Hearing on Track
Think of the battery as the engine that powers your hearing aid. It provides the essential energy needed to run all the intricate components we’ve discussed. Without a properly functioning battery, your hearing aid becomes nothing more than a sophisticated decoration.
The Importance of Battery Life:
A reliable and long-lasting battery is vital for uninterrupted hearing and a sense of security. Dead batteries in social settings or important meetings can be frustrating and isolating.
Choosing the Right Battery:
The good news is that hearing aid batteries are tiny powerhouses specifically designed for these devices. They come in various sizes, with each size offering a different runtime depending on the power consumption of your hearing aid and your usage patterns. Here are the most common types:
- Zinc-air batteries: These are the most widely used type. They come deactivated and are activated by removing a sticker that allows air to reach the zinc inside. Once activated, they typically last 3-10 days, depending on size and usage.
- Rechargeable batteries: While less common, rechargeable batteries are becoming increasingly popular. They offer an eco-friendly option and can last several days on a single charge. However, they require a charging case and may not be suitable for everyone.
When choosing a battery, it’s important to consult your hearing healthcare professional. They can recommend the right size and type based on your specific hearing aid model and your daily listening needs.
Finding Your Perfect Volume: The Role of the Volume Control
Imagine you’re at a restaurant enjoying a meal with friends. The conversation is lively, but there’s also background music and clinking glasses. With a hearing aid, you might find some sounds uncomfortably loud, while others are still faint. This is where the volume control comes in, your trusty companion for adjusting the overall loudness of your hearing aid.
Fine-Tuning Your Listening Experience
The volume control is usually a small wheel or button located on the casing of your hearing aid. By adjusting it, you can increase or decrease the amplification level of all sounds coming through the device. This allows you to personalize your listening experience based on the environment you’re in:
- Turning down the volume: In noisy environments like restaurants or parties, you can use the volume control to lower the overall loudness and make conversations easier to understand by reducing background noise.
- Turning up the volume: In quieter settings like libraries or one-on-one conversations, you might need to increase the volume to ensure you hear all sounds clearly.
Why Personalized Volume Control Matters
Hearing loss affects people differently. Some individuals might have a more significant loss in high frequencies, while others may struggle more with low frequencies. Additionally, hearing loss can vary across one ear versus the other.
This is why having a volume control on your hearing aid is crucial. It empowers you to adjust the amplification based on your specific needs and preferences. With the right volume setting, you can achieve a comfortable listening experience and ensure that sounds are amplified to a level that allows you to hear and participate in conversations with confidence.
Additional Considerations:
While the volume control provides flexibility, it’s important to avoid constantly adjusting it. It’s generally recommended to find a comfortable baseline setting and only make adjustments when necessary due to significant changes in your environment. If you find yourself frequently adjusting the volume, consult your hearing healthcare professional. They can assess your needs and ensure your hearing aid is programmed appropriately for optimal hearing in various situations.
Switching Modes with Ease: The Power of the Program Button
Imagine attending a movie, a bustling restaurant, and a quiet meeting all in one day. Each environment presents unique listening challenges. The good news is that modern hearing aids are equipped with a remarkable feature: the program button. This tiny button unlocks a world of customized listening experiences.
A World of Programs at Your Fingertips
The program button allows you to switch between different hearing programs pre-set on your hearing aid. These programs adjust various internal settings, like noise reduction, amplification levels, and directional focus, to optimize your hearing for specific situations. Here are some common program types:
- Quiet Program: Ideal for one-on-one conversations or quiet environments like libraries. This program reduces background noise and emphasizes speech sounds for improved clarity.
- Noisy Program: Perfect for restaurants, cafes, or busy streets. This program focuses on amplifying speech while actively suppressing background noise, helping you follow conversations more easily.
- Music Program: Designed to enhance the full spectrum of sounds in music, offering a richer listening experience.
- Directional Program: This program focuses on sounds coming from directly in front of you, making it ideal for situations like lectures or meetings where you want to hear the speaker clearly amidst background noise.
Beyond Presets:
Some advanced hearing aids may offer additional program options or allow you to customize existing programs to your preferences. It’s like having a remote control for your hearing, fine-tuning your listening experience for various environments.
How the Program Button Empowers You
The program button empowers you to take control of your hearing in different situations. By switching between programs, you can optimize your hearing aid’s performance and ensure you can hear and participate with confidence, regardless of the environment.
Working with Your Audiologist:
Your hearing healthcare professional, also known as an audiologist, will program your hearing aid with the most suitable programs based on your hearing loss and lifestyle. They can also guide you on how to effectively use the program button to get the most out of your hearing aid.
Taking Control: The Power of the On/Off Switch
Your hearing aid is a marvel of technology, but just like any electronic device, it requires power to function. This is where the humble on/off switch steps in, providing you with control over when your hearing aid is active and conserving battery life.
Turning Your Hearing On and Off
The on/off switch, typically a small button or slider, allows you to power your hearing aid on and off as needed. This offers several benefits:
- Convenience: When you don’t need your hearing aid, like at night while sleeping or in quiet environments at home, you can simply turn it off to avoid unnecessary battery drain.
- Preserving Battery Life: Batteries are a vital component of your hearing aid, and their lifespan is finite. Turning off the hearing aid when not in use significantly extends battery life, ensuring you get the most out of each battery.
Using the On/Off Switch Wisely
While the on/off switch offers convenience and battery savings, it’s important to develop good habits for its use:
- Avoid Frequent On/Off Toggling: Constantly turning the hearing aid on and off can put unnecessary wear and tear on the switch itself. It’s generally recommended to keep your hearing aid on throughout the day in most situations.
- Managing Moisture: When you’re not using your hearing aid, it’s wise to leave the battery compartment open in a dry environment. This allows any moisture that might have accumulated to evaporate, preventing potential damage to the device. Some hearing aid cases come with built-in dehumidifiers for this purpose.
By using the on/off switch strategically and following proper storage practices, you can maximize battery life and ensure your hearing aid remains in optimal condition.
Additional Considerations:
Some hearing aids may also offer automatic features that turn them on and off based on movement or specific environments. Discuss these options with your audiologist to see if they might be a good fit for your needs and lifestyle.
Beyond the Microphone: The Magic of the T-Coil
We’ve explored the core components of a hearing aid responsible for capturing sound waves, amplifying them, and translating them back into audible signals. But there’s another hidden gem within some hearing aids: the telecoil, also known as a T-coil. This unsung hero unlocks a world of improved listening in specific situations.
A Tiny Coil with Big Benefits
Imagine a miniature coil of wire tucked discreetly inside your hearing aid. That’s essentially what the T-coil is. Unlike the microphone, which picks up sound waves traveling through the air, the T-coil specializes in detecting electromagnetic signals.
How it Works:
When a T-coil is activated, it acts like a tiny antenna. It can pick up electromagnetic fields generated by loop systems installed in various public places. These loops transmit an audio signal directly to the T-coil, bypassing the microphone altogether.
Applications of T-Coil Technology:
The T-coil offers significant benefits in specific situations:
- Improved Clarity in Public Venues: Many theaters, auditoriums, houses of worship, and conference centers utilize hearing loops. When you activate the T-coil program on your hearing aid and sit within the loop’s range, you’ll receive the audio signal directly, often with superior sound quality and significantly reduced background noise compared to relying solely on the microphone.
- Crystal-Clear Phone Calls: Some landline telephones and most modern cell phones emit a weak electromagnetic signal when placed near the hearing aid. By activating the T-coil program, you can eliminate background noise and improve the clarity of phone conversations.
Not all Hearing Aids Have T-Coils:
It’s important to note that not all hearing aids come equipped with a T-coil. If you’re interested in this functionality, consult your hearing healthcare professional about hearing aids that feature a T-coil.
The Advantages of T-Coil Technology:
The T-coil offers several advantages for hearing aid users:
- Reduced Background Noise: By bypassing the microphone and relying on the direct electromagnetic signal, the T-coil significantly reduces background noise, making speech clearer and easier to understand in noisy environments.
- Improved Sound Quality: The electromagnetic signal from loop systems is often of higher quality than the sound picked up by the microphone, leading to a richer and more natural listening experience.
- Enhanced Accessibility: The T-coil technology opens doors to better listening experiences in various public settings, promoting social inclusion and participation.
If you’re looking for ways to improve your hearing aid’s performance in specific situations, the T-coil might be a valuable feature to consider. Discuss your needs and preferences with your hearing healthcare professional to see if a T-coil equipped hearing aid is the right choice for you.
The Anchor Behind the Scenes: All About Ear Hooks
We’ve delved into the inner workings of hearing aids, exploring how they capture, amplify, and translate sound. But a hearing aid needs a way to stay securely in place to function effectively. This is where the often-overlooked hero comes in: the ear hook.
Keeping Your Hearing Aid in Place
Imagine a small, curved piece of plastic or wire that loops behind your outer ear. That’s the basic design of an ear hook. It acts as an anchor, attaching the body of the behind-the-ear (BTE) hearing aid to your ear comfortably and discreetly.
The Attachment Process:
The ear hook typically connects to the hearing aid casing with a small clip or locking mechanism. The curved end of the hook then fits snugly behind the upper ridge of your outer ear, holding the hearing aid body securely in place.
Fit is Paramount
A secure and comfortable fit is crucial for several reasons:
- Optimal Performance: When the ear hook sits correctly, it ensures the microphone and receiver are positioned optimally in relation to your ear canal. This allows for clear sound reception and transmission, maximizing the hearing aid’s effectiveness.
- Comfort Matters: A well-fitting ear hook should feel comfortable and secure throughout the day. It shouldn’t cause any irritation or pressure on your ear.
- Preventing Feedback: A loose-fitting ear hook can allow sound to leak from the receiver back into the microphone, creating a whistling or howling sound called feedback. A secure fit minimizes this possibility.
Different Types of Ear Hooks:
Ear hooks come in various materials like plastic or soft, flexible silicone to cater to different preferences and comfort levels. Some manufacturers offer color options to match your hair color or make the ear hook less noticeable.
Finding the Perfect Fit:
Your hearing healthcare professional plays a vital role in ensuring a proper fit for your ear hook. They will assess your ear anatomy and recommend the right size and type of ear hook for your specific needs. They can also make adjustments to the ear hook for optimal comfort and performance.
By having a secure and comfortable fit, the ear hook becomes a silent partner, ensuring your hearing aid stays in place and operates effectively, allowing you to focus on what matters most – enjoying the world of sound around you.
Tailored for You: All About Earmolds
While ear hooks are fantastic for keeping behind-the-ear (BTE) hearing aids securely in place, some users benefit from an even more customized solution: the earmold.
Directing Sound with Precision
Imagine a custom-made piece that fits snugly and comfortably within the contours of your outer ear canal. That’s the essence of an earmold. It’s a small, typically dome-shaped piece crafted from soft plastic or silicone and plays a crucial role in sound delivery:
- Creating a Seal: A well-fitted earmold creates a tight seal within your ear canal. This prevents sound leakage, which can occur with ear hooks, and ensures that the amplified sound from the receiver travels efficiently directly to your eardrum. This leads to a clearer and more natural listening experience.
- Directional Benefits: Earmolds can be designed to position the sound outlet from the hearing aid closer to your eardrum. This can be particularly beneficial for individuals with high-frequency hearing loss, as these frequencies are more directional and require precise delivery for optimal perception.
A Perfect Fit for Every Ear
The beauty of earmolds lies in their customization. Unlike ear hooks, which come in standardized sizes, earmolds are created specifically for your unique ear shape. Here’s how it works:
- Taking an Impression: Your hearing healthcare professional will make a mold of your outer ear canal using a soft, putty-like material. This impression captures the intricate details of your ear shape.
- Crafting Your Earmold: The impression is then used to create a custom-made earmold, ensuring a perfect fit that is comfortable and secure.
- Material Options: Earmolds typically come in two main materials: soft silicone and acrylic. Silicone is generally more flexible and comfortable for everyday wear, while acrylic might be preferred for its durability.
Additional Considerations:
Earmolds require some maintenance to function optimally. Your hearing healthcare professional will advise you on proper cleaning techniques to remove earwax buildup and ensure the earmold continues to provide a good seal and optimal sound quality.
Who Benefits from Earmolds?
Earmolds are not for everyone, but they offer some distinct advantages:
- People with Severe Hearing Loss: For individuals with severe hearing loss, earmolds can help create a tighter seal and prevent sound leakage, maximizing the effectiveness of the hearing aid.
- High-Frequency Hearing Loss: By positioning the sound outlet closer to the eardrum, earmolds can improve the perception of high-frequency sounds, which are often the first to be affected by hearing loss.
- Those Who Prefer a Secure Fit: Some users simply prefer the extra security and stability that a custom-fitted earmold provides compared to an ear hook.
The Invisible Path: All About Sound Tubes
We’ve explored the various components within a hearing aid and how they work together to capture sound, amplify it, and deliver it to your ear. But there’s one crucial element that bridges the gap between the hearing aid and your ear: the sound tube.
A Thin Tube, Big Responsibility
Imagine a thin, flexible tube made of plastic or rubber. That’s the sound tube in its simplest form. It acts as a vital conduit, channeling the amplified sound waves from the receiver within the hearing aid body to the earmold (or directly to your ear canal in the case of Receiver-in-Canal (RIC) hearing aids).
Ensuring Clear Sound Delivery:
The sound tube plays a significant role in sound quality:
- Efficient Transmission: A well-maintained sound tube ensures the amplified sound travels efficiently from the receiver to your ear. This helps to maintain the clarity and fullness of the sound.
- Minimizing Feedback: A properly fitted sound tube minimizes the possibility of sound leaking back from the ear canal into the microphone. This prevents the annoying whistling or howling sound known as feedback.
Keeping Your Sound Tubes in Top Shape
Sound tubes are relatively durable, but they require some maintenance for optimal performance:
- Regular Cleaning: Earwax buildup can clog the sound tube, hindering sound transmission. It’s essential to clean the sound tube regularly with a soft, dry cloth as recommended by your hearing healthcare professional.
- Replace When Needed: Over time, sound tubes can become stiff, cracked, or discolored. This can affect sound quality and potentially cause feedback. Most sound tubes need to be replaced every 3-6 months, or as recommended by your hearing healthcare professional.
Signs Your Sound Tube Needs Replacing:
- Reduced Sound Quality: If you notice a decrease in sound clarity or a muffled quality to the sound coming from your hearing aid, it might be a sign that the sound tube is clogged or needs replacing.
- Cracks or Tears: Visually inspect the sound tube for any cracks or tears. These can compromise the sound quality and should prompt a replacement.
- Loose Connection: If the sound tube feels loose at either end, it might not be creating a proper seal and could be affecting sound delivery.
Maintaining Optimal Performance:
By following these simple maintenance tips, you can ensure your sound tubes function properly and deliver clear, amplified sound to your ears. Remember to consult your hearing healthcare professional if you have any questions or concerns about maintaining or replacing your sound tubes. They can provide guidance specific to your hearing aid model and your individual needs.
The Hearing Aid Orchestra: A Recap and Why It Matters
Throughout this blog post, we’ve delved into the fascinating world of hearing aids, exploring the intricate components that work together to bring the soundscape back to life for those with hearing loss. Here’s a quick recap of the key players in this remarkable technological marvel:
- Microphone(s): These tiny marvels capture sound waves and convert them into electrical signals.
- Amplifier: This powerhouse boosts the strength of the electrical signals to make sounds audible for those with hearing loss.
- Receiver: The magic of the receiver lies in transforming the amplified electrical signals back into sound waves that your ear can interpret.
- Battery: The unsung hero, the battery provides the essential energy to keep all the components functioning.
- Volume Control: This allows you to personalize the listening experience by adjusting the overall loudness of your hearing aid.
- Program Button: With the program button, you can switch between pre-set programs optimized for different listening environments.
- On/Off Switch: This switch empowers you to control when your hearing aid is active, helping to conserve battery life.
- Telecoil (T-Coil) (optional): This hidden gem in some hearing aids picks up electromagnetic signals from loop systems, enhancing listening clarity in specific situations.
- Ear Hook (BTE hearing aids): This anchor keeps the behind-the-ear hearing aid securely in place.
- Earmold (optional): A custom-made piece that provides a snug fit in your ear canal, creating a seal for optimal sound delivery.
- Sound Tube (BTE and RIC hearing aids): This thin tube acts as a bridge, channeling the amplified sound from the hearing aid to your earmold or ear canal.
Understanding these components and their functions empowers you to:
- Make informed decisions: Knowing how your hearing aid works allows you to choose the right features and functionalities to suit your specific needs and preferences.
- Optimize usage: By understanding the different program buttons and volume controls, you can customize your hearing aid for optimal performance in various listening environments.
- Proper care and maintenance: Knowing how to clean sound tubes, replace batteries, and store your hearing aid properly can extend its lifespan and ensure optimal performance.
With a basic understanding of these components, you can become a partner in your hearing health journey. By working with your hearing healthcare professional and utilizing your hearing aid effectively, you can reconnect with the world of sound and rediscover the joy of clear communication and participation in everyday life.
Frequently Asked Questions About Hearing Aid Parts
Here are some frequently asked questions about the parts of a hearing aid:
1. How many microphones do hearing aids typically have?
Most hearing aids have one or two microphones. Dual microphones can offer advantages like directional hearing, which helps to focus on sounds coming from directly in front of you and reduce background noise.
2. What are the different types of hearing aid batteries?
The most common type of hearing aid battery is a zinc-air battery. These come deactivated and are activated by removing a sticker. They typically last 3-10 days depending on size and usage. Rechargeable batteries are becoming increasingly popular and offer an eco-friendly option, but they require a charging case.
3. How often should I adjust the volume on my hearing aid?
There’s no one-size-fits-all answer. You may need to adjust the volume throughout the day depending on your environment. In noisy places, you might need to turn it up, while in quiet settings, a lower volume might be more comfortable.
4. What are the benefits of using hearing aid programs?
Hearing aid programs offer pre-set adjustments to various internal settings like amplification levels and noise reduction. This allows you to optimize your hearing aid’s performance for specific situations. For example, a quiet program might emphasize speech sounds, while a music program might focus on delivering the full spectrum of musical tones.
5. Do all hearing aids have a T-Coil?
No, not all hearing aids come equipped with a T-coil. If you’re interested in this functionality, consult your hearing healthcare professional about hearing aids that feature a T-coil. The T-coil allows you to pick up electromagnetic signals from loop systems installed in public places like theaters or conference centers, improving listening clarity in these environments.
6. How can I tell if my sound tube needs replacing?
There are a few signs that might indicate your sound tube needs replacing. These include reduced sound quality, cracks or tears in the tubing, or a loose connection at either end. It’s generally recommended to replace your sound tubes every 3-6 months, or as advised by your hearing healthcare professional.
7. How should I clean my hearing aid?
It’s important to clean your hearing aid regularly to remove earwax buildup and ensure optimal performance. Consult your hearing healthcare professional for specific cleaning instructions for your hearing aid model. Generally, a soft, dry cloth is recommended for cleaning the exterior of the hearing aid.
8. Where can I learn more about hearing aids?
If you have further questions about hearing aids or their components, it’s always best to consult a hearing healthcare professional. They can assess your individual needs and recommend the most suitable hearing aid for you. You can also find helpful resources online from reputable organizations like the American Academy of Otolaryngology-Head and Neck Surgery (AAO-HNS) or the Hearing Loss Association of America (HLAA).
Read More:
Hear Life Clearly: The Ultimate Guide to Hearing Aids for Women
Miracle-Ear vs Phonak Hearing Aids: Choosing the Right Fit for Your Needs

2 thoughts on “Parts of a Hearing Aid: A Comprehensive Guide to How They Work”